
A truly unique mirror!
- Keith Tribe
- Jun 28, 2018
- 2 min read

This month, as we head into the hotter days of the summer I thought I would highlight a neat project that I worked on this spring and take you on a journey through the process of creating it to get a feel for what a very unique piece requires!
Early in the spring (well actually it was still pretty much winter around here) I went to my supplier for unique wood and saw a slab that had been set aside for me that was absolutely stunning!


This project wasn't commissioned, it was just something I knew I had to make. I painstakingly cleaned every single little hole in the slab with my dental tools to remove decades of crusted and dried debris. After about 20 hours of prep, this slab was finally ready to be cut and assembled, I just had to figure out how I was going to do it!
It's usually over a good cup of coffee and time just pondering in the shop that I figure out how and where I want to cut a slab. I knew that this would be a decor mirror more than a mirror you would get dressed in front of in the morning. With this in mind I thought, I bet I could get those curls on the inside of the mirror and really give it some depth! This slab was over 2" thick when I bought it and I had it planed down to the beautiful smooth finish by some woodworking friends. I can tell you I was nervous watching the curls go through the planer but it came out beautifully!
After the initial cuts, it was time to assemble and see how it would all fit together!


Once I had it laid out, I thought, lets see how this looks with a mirror behind it. Luckily I always have plenty of mirror kicking around so I added a mirror to see how it would look!


I was finally satisfied that this mirror was all set up the way I wanted it, so then it was time to secure it together with my combination of backing plates, wood glue and just the right amount of luck!
With the frame secure, it was time for my favourite part, the clear coat! Covering this beautiful mirror in a clear coat gave it a ton of depth and added colour naturally. It took a few coats but once it was done it was ready for the professionally installed mirror to be siliconed in place.


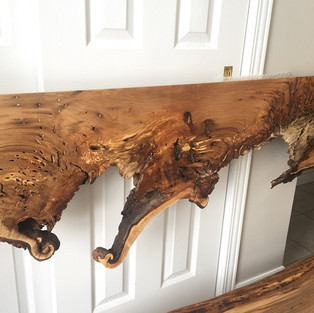


When I finally got this behemoth home with the mirror installed we couldn't wait to get some pictures! I even got behind it to give some perspective. This mirror is 7' long, 40" wide and 2" thick! It will make an incredible show piece for someones home and I can easily picture it mounted over a couch, or a fireplace, or somewhere you really want people to walk in and say "WOW!".


Luckily for you, this is available to the first person who wants it! You can find more info on my page for pieces that are available here
Want to also know the best part? I found the slab from the slice just before (or after) this one when it was cut..... stay tuned!!!!


Comments